
by Michael Marchuk
If you haven't read Chapter 9, "An Introduction to Distributed Objects", you may want to go back and at least browse through the information contained there. This chapter will assume you have an understanding of the basics behind distributed application development that were covered in Chapter 9.
This chapter focuses on explaining the core ActiveX objects which are included with Microsoft's Internet Explorer 3.0. By understanding these components, you will be able to see how ActiveX objects can fit into your own distributed applications. By now you're probably eager to begin learning how specific ActiveX objects will be able to meet the needs of your interactive Web pages or distributed applications.
Specifically, this chapter covers:
ActiveX objects will become much more real to you after you have read this section. Until now, the discussion of ActiveX objects has been conceptual. Now, you can be exposed to some of the real aspects of installing, using, and programming with ActiveX objects. As you read through the discussions of the various objects, let your mind wander to the Web pages that you have developed and to the applications which you've been waiting to move on to the Internet. These controls, and the many others which are currently available, will enable your plans for an interactive Internet application to become reality with VBScript.
Chapter 9 mentioned the concept of installing objects using a trust arrangement with a Certificate Authority (CA). Since the ActiveX controls are signed with a digital fingerprint that is verified by a CA, the users which download the objects will feel more confident about the distributed applications they are running. Additionally, you will feel better about the objects that you incorporate into your distributed applications, knowing that they are sealed with a tamper-evident digital signature.
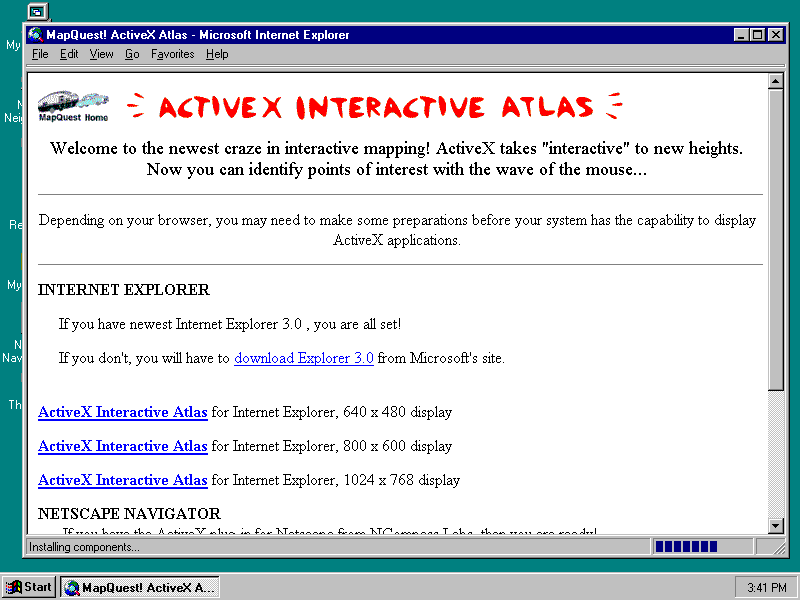
You learn how to incorporate ActiveX objects into your Web pages later on in Chapter 11, "Designing VBScript Applications", so for now, assume that you have successfully implemented the object within your HTML document. Since this is a distributed environment, the user who downloads your Web page may not already have the ActiveX component that you have used. In this case, the browser will have to retrieve and install the object before your application runs. Figure 7.1 shows a page which contains an object which is not available locally and must be downloaded. Note the status bar on the bottom of the Internet Explorer window which indicates that the objects are being installed locally.
ActiveX objects must be available locally to be used by a distributed application or interactive Web page.
After an ActiveX object has been downloaded from an archive, the object must be installed on the user's system. Recall that the digital signature which accompanies the object must be checked with the Certificate Authority which issued the signature. After the signature has been authenticated, the user is presented with a verification dialog like the one shown in Figure 7.2.
ActiveX object installation requires the user to accept the validated digital signature from the Certificate Authority that issued it.
The user is allowed two options on the dialog box. The first option allows the user to place full trust in the software developer who wrote the object so that when another object by the same vendor is required, the browser will automatically trust the authenticated digital signature and install the software. The second option indicates that any object which is signed by this particular Certificate Authority will be trusted, no matter who the vendor is.
![]()
You will have to decide how much trust to place on the various vendors and Certificate Authorities before you answer these questions. It may be wise to leave the automatic acceptance selections unchecked until you feel more comfortable about the vendor or the Certificate Authority.
![]()
After an object has been successfully installed on the user's system, any future references to that object will not require the system to reload the object from an archive. If a future Web page is encountered which requires a newer version of the object, the browser will have to download the new object. Now that you've been exposed to the installation of ActiveX objects, lets see what types of objects are available.
The ActiveX framework allows an HTML page to contain an OBJECT identifier tag that specifies the various parameters necessary to use a particular object. For example, Figure 7.3 shows a code window which contains the various pieces required to implement an animated button control.
FIG. 7.3
ActiveX objects can be added to an HTML page using simple code that describes the operation of the object.
As a VBScript developer, you can add any number of ActiveX components to your HTML page to create the environment you need. The OBJECT tag indicates that the information contained within the brackets pertains to a particular object. The information contained within this OBJECT tag will be provided to you by the ActiveX vendor that supplied the component. Typically, a vendor-supplied component would be installed on your system using a standard setup application under Windows. A component can be supplied on a floppy or downloaded from a vendor's Internet server. Once that component has been installed, you need to make the runtime version of that component (if it is different than the developer's version) available on your Web server for others to download when they use your distributed application.
The ActiveX properties are assigned using the PARAM tags. Each PARAM tag has a NAME and a VALUE which identify which property is being set and to what value. For example, if a particular ActiveX control included a property for changing the size of the font on the control, you might include a line like the one in the following example.
<PARAM NAME="FontSize" VALUE="12">
Since some ActiveX controls will have more properties than others you may add as many PARAM tags as necessary. Most controls will assume a default value if you do not specify a particular property value using the PARAM tag. While this is not bad, it may produce unwanted results. You might be better off explicitly setting each property value to ensure that your application runs and looks the way you want it to.
Now that you've seen how the ActiveX controls are added into your HTML pages, let's take a look at some of the default ActiveX controls which the Internet Explorer 3.0 uses.
Windows software has been using animated buttons for years. Animated buttons are button controls which allow a series of images to be repeated on top of a button either continuously or when the button changes states. For example, you may have a Web page which includes a search function for your Web site. The animated button you use could have a rotating magnifying glass which scans over pages flying by when the button is pushed.
Animated buttons require a certain flair for creativity and graphical art talent, but then you probably already have some of that in you if you've been designing HTML pages. The animated button control provides five events that activate the various animations associated with you control. These events are:
Additionally, you may obtain various properties from the button control. Notice that the properties correspond closely to the events listed above. The properties are:
The animated button has four states. These states are:
![]()
While a button may actually be in multiple states at once, like when the button has the focus and the mouse cursor moves over the button, only one event will trigger at a time. To handle these types of conditions, there are certain states that take precedence over other states. For example, the Mouseover event will trigger when the button has focus. The Down event will trigger even if the button has focus and the mouse cursor is over the control.
![]()
Creating colorful charts is easily accomplished using the chart control object. The chart control supports seven basic types of charts:
Each of these chart types supports properties (see Table 7.1) that allow you to control the number of rows and columns, grid lines, color schemes, transparency of the background, the scale of the chart, and whether a legend should be included. Additionally, each of the basic chart types may support variations such as simple, stacked, or full. Figure 7.4 shows an example of a chart created by this object.
Fig. 7.4
The chart object can create great-looking charts with little effort.
The gradient control object allows an area to be filled with a color which transitions to another color across the area. For example, the installation screens for most Windows applications use a blue to black gradient as a backdrop. The gradient control has few properties (see Table 7.2) that are needed to create this effect. Figure 7.5 shows an example of the gradient object.
Fig. 7.5
The gradient object can be used to create interesting effects.
Table 7.2 Gradient Control Object Properties
| Property | Value Description | Example |
| StartColor, EndColor | Define the two colors which will be used in the transition. Note that the color is defined by using the standard hexadecimal HTML color codes. | <PARAM NAME="STARTCOLOR" VALUE="#FFFFFF"> |
| StartPoint, EndPoint | Define the coordinates (x,y) within the HTML page which will be filled using the specified gradient. | <PARAM NAME="STARTPOINT" VALUE="25,25"> <PARAM NAME="ENDPOINT" VALUE="575,75"> |
| Direction | Defines the gradient effect which will be used with the colors specified. The values are: 0 = Horizontal (start at left) 1 = Vertical (start at top) 2 = Towards center 3 = Towards corner 4 = Diagonal down (start at left) 5 = Diagonal up (start at left) 6 = Around the "StartPoint" coordinate 7 = Across the line between "StartPoint" and "EndPoint" |
<PARAM NAME="DIRECTION" VALUE="1"> |
The label object allows text to be displayed at an angle on the page using a particular font, color, and style. You may wonder why you would want to use a label rather than just a standard HTML tag such as <FONTSIZE = 7>. The power of the label object comes from two factors: the ability to rotate the text to any angle, and the ability to use the events triggered by the control. The label object supports several events including:
These events will give you the freedom to create interactive text which may spin or change colors as the user moves the mouse over the label's text. Figure 7.6 shows how this object can be used.
Fig. 7.6
The label object gives you more freedom when placing text on an HTML page.
There may be times when you want to highlight new items on a particular HTML page. The New Item object handles this by displaying an image until a particular date. After that date, another image may be shown, if desired. Table 7.4 outlines the properties available from the new item object.
You most commonly use this object when you add headlines or sections to an HTML to which you would like to draw attention when they've been added. The date parameter also allows you to manage when the added item is no longer considered new.
Table 7.4 New Item Object Properties
| Property | Value | Example |
| Date | Specifies the date until which the specified graphic will be shown. | <PARAM NAME="DATE" VALUE=”10/31/96”> |
| Image | Specifies the URL to which the image will bedisplayed | <PARAM NAME="IMAGE" VALUE=”http://www.xyz.com/images/new.gif”> |
You may have a need to use a popup menu within your distributed application. The Popup Menu object allows your HTML page to contain an image or button which causes the menu to appear. The items on the menu are created when the object is loaded. The menu items themselves are activated when the user clicks on the menu item (see fig. 7.7). This action fires the IEPop_Click() subroutine and passes the items list index value. The only property for the popup menu object is listed in Table 7.5. Note that the property may be repeated for multiple items.
FIG. 7.7
The popup menu allows your HTML pages to use new means of gathering data or linking to other pages.
Table 7.5 Popup Menu Object Property
| Property | Value | Example |
| Menuitem[] | Specifies the item in the pop-up menu array. | <PARAM NAME="MENUITEM[1]" VALUE="First Item"> <PARAM NAME="MENUITEM[2]" VALUE="Second Item"> |
Your application may make use of some performance enhancements through the preloader object. This object will begin downloading pages in the background while a user is still reading the current page. By doing so, the user will experience a much faster load of the next page since the images and text will already be loaded into the browser's cache directory.
It is possible to overuse the preloader object and download everything at once. This is an unnecessary waste of bandwidth and disk storage since the user may not go to the next page. However, you may have a set of Web pages that would benefit from the preloader object. The properties for the preloader object are shown in Table 7.6.
Table 7.6 Preloader Object Properties
| Property | Value Description | Example |
| CacheFile | The name of the local file contained in the browser's cache. This property is read-only. | (within VBScript) CachFileName= ieprld.CacheFile |
| Data | The contents of the file which was read in. This property is read-only. | (within VBScript) DataDownloaded= ieprld.Data |
| Enable | This property switches the control on and off: 0 = Disabled 1 = Enabled |
<PARAM NAME="ENABLE" VALUE="1"> |
| URL | This property specifies which file to download when the control is enabled | <PARAM NAME="URL" VALUE="http://www.xyz.com/pricing.html"> |
Your distributed application may call for a constant display of information at the bottom of the screen or within a frame. The stock ticker object can handle this sort of constant update display by downloading an XRT file which handles real-time data. The stock ticker object scrolls the data from right to left as it is loaded. The file which is loaded is refreshed using a periodic interval. The file format of the data follows the XRT format. This format is as follows:
XRT file format
XRT
DataName1<TAB>DataValue1<TAB>DataValue2...<CR><LF>
DataName2<TAB>DataValue1<TAB>DataValue2...<CR><LF>
The XRT file contains data records which use a tab character to separate the data within the record. The data record may include any number of data values separated by tabs. The record is terminated by a carriage return and a line feed character. For example, an XRT file which contains sports scores might look like this:
XRT
Cubs/Mets<TAB>10<TAB>3<TAB>Bottom of Ninth<CR><LF>
Sox/Expos<TAB>5<TAB>2<TAB>Top of Third<CR><LF>
An XRT file can contain as many data elements as necessary, but the display of this data is limited to the stock ticker format. The properties of the stock ticker object are shown in Table 7.7.
Table 7.7 Stock Ticker Object Properties
| Property | Value Description | Example |
| BackColor, ForeColor | These properties specify the color scheme for the background and the foreground. The colors are indicated using the standard HTML color coding. | <PARAM NAME= "BACKCOLOR" VALUE="#FFFFFF"> |
| DataObjectName | Indicates the data source. This can be a URL or an OLE object that generates the XRT data stream. | <PARAM NAME= "DATAOBJECTNAME" VALUE="http://www.xyz.com/RealTime/ Baseball/ALWest.XRT"> |
| DataObjectActive | This property is used to toggle the data refreshing. 0 = Data source is inactive. 1 = Data source is active. |
<PARAM NAME= "DATAOBJECTACTIVE" VALUE="1"> |
| ScrollWidth | Specifies how much data is scrolled during each scroll interval. | <PARAM NAME= "SCROLLWIDTH" VALUE="10"> |
| ScrollSpeed | Specifies the interval (in seconds) in which the display is scrolled. | <PARAM NAME="ScrollSpeed" VALUE="1"> |
| ReloadInterval | Specifies the interval (in seconds) between the XRT file reloading. This interval is also used to refresh the data stream from an OLE server which is providing the data. | <PARAM NAME= "RELOADINTERVAL" VALUE="10"> |
| OffsetValues | Specifies that the data element will be offset from the name element by the indicated number of vertical pixels. This gives the appearance or superscript or subscript text. | <PARAM NAME= "OFFSETVALUES" VALUE="-20"> |
The timer object will enable your distributed application or HTML page to animate text, change colors of objects, or trigger some other event at a periodic interval. The timer control has only a few properties and one event. The properties for the timer object are shown in Table 7.8.
Table 7.8 Timer Object Properties
| Property | Value | Example |
| Enabled | The timer control object can be enabled or disabled by setting this property to the following values: True = Timer enabled False = Timer disabled |
<PARAM NAME="ENABLED" VALUE="TRUE"> |
| Interval | This property specifies the interval (in milliseconds) between event triggers. When set to zero or a negative number the timer will act as though it was in a disabled state. | <PARAM NAME="INTERVAL" VALUE="1000"> |
Many more ActiveX controls are available which can provide the display or processing power which you desire in your distributed application. Currently, Microsoft is maintaining a list of the vendors which are producing ActiveX controls. This list can be found at http://www.microsoft.com/activex/controls/.
The ActiveX software development kit is currently available only for the Visual C++ environment, however, Microsoft has mentioned that a Visual Basic environment is in the works. This will provide the ability of creating your own ActiveX components to be used on your own or others HTML pages.
Developing ActiveX components is beyond the scope of this book, but it should be mentioned that the process and tools for these components are evolving quickly. By the time this book is published, some of the more difficult development tasks surrounding ActiveX object development may be automated by the advancing tools used to create them. But for now, the development of ActiveX objects requires a relatively involved development environment including Microsoft's Visual C++.
ON THE WEB
http://www.microsoft.com/intdev/sdk/ For more information on developing ActiveX objects see Microsoft's Web site.
Now that you've had a taste of the ActiveX controls you can use, you're probably ready to start trying them out in some sample VBScript enabled pages. Check out the following chapters to see how these controls are used within VBScript:
| Previous Chapter | Next Chapter |
| Search | Table of Contents | Book Home Page | Buy This Book |
| Que Home Page | Digital Bookshelf | Disclaimer |
To order books from QUE, call us at 800-716-0044 or 317-361-5400.
For comments or technical support for our books and software, select Talk to Us.
© 1996, QUE Corporation, an imprint of Macmillan Publishing USA, a Simon and Schuster Company.